
Category: FAQ

  • How Google 360° Virtual Tours Transform Healthcare Outreach

    How Google 360° Virtual Tours Transform Healthcare Outreach

    Introduction

    In today’s changing healthcare environment, Google 360° virtual tour technology for medical facilities is becoming a key tool for connecting patients. Patients have moved away from choosing healthcare providers based on just reputation or even referral. Rather, possible patients are now routinely looking online resources, interested in every detail of a clinic or hospital’s presence, before calling for an appointment. A professional virtual tour enables you to showcase everything about your facility online (think sterile treatment rooms, welcoming waiting rooms, advanced diagnostic labs or the welcoming reception) – an immersive reassuring experience that ultimately differentiates your practice.

    Why a Virtual Tour is Your 24/7 Welcome Center

    This technology is actually changing how clinics, hospitals, specialty centers, and dental practices in India and around the world attract new patients, develop trust, and ultimately, transparency in the health care journey. Basically, it’s like having your doors open 24/7 providing a peaceful preview, from anywhere in the world. For example, you can see exactly how it works by checking our portfolio on our website @samdataservices.com

    1. Create a Reassuring First Impression

    For most potential patients, their first impression of a healthcare facility is made online – whether that is via health directories or (more often) through your Google Business Profile. As a result, a Google 360° virtual tour for healthcare providers instantly differentiates your facility by:

    • Creating a rich immersive experience that images alone cannot provide.
    • Allowing prospective patients to “walk through” your space from their mobile or desktop device and examine every relevant area they will enter for their visit.
    • Additionally, creating an immediate feeling of familiarity and lessening the anxiety, so they at least feel a little more comfortable before they walk in your door.

    Example: A specialty dental clinic in Hyderabad, for example, realized a 30% increase in new patient inquiries and significantly fewer last minute cancellations within 3 months of implementing a Google Virtual Tour of their modern facility. You may also view a collection of our completed tours within our website @samdataservices.com

    2. Build Trust and Transparency with Patients

    Ultimately, for patients and their families, selecting a healthcare provider is a very personal and often stressful decision and The first consideration is cleanliness, followed by modern equipment, then the atmosphere that is professional yet inviting, and finally, patient comfort. A virtual tour allows you to show that you have nothing to hide! This allows you to help patients answer important questions without needing to physically come in. This level of transparency thus provides:

    • A clear and a really easy view of consultation rooms, treatment areas, waiting lounges, and, surgical suites if applicable, thus reducing some of the uncertainties and anxieties for patients that want to “see” first.
    • Also, establishing unquestionable credibility and developing unshakeable trust in an industry where patient trust is critically important.
    google 360 virtual tours of hospital

    3. Get More Patients with a Clear Advantage

    We all know at whatever point a prospective patient needs a healthcare provider they will inevitably do some level of comparison shopping of potential healthcare providers. In that regard, a Google 360° Virtual Tour provides several key benefits:

    • Firstly, your listing now pops in Google Search & Maps along with health listings.
    • Secondly, potential patients are spending significantly more time on your listing, which leads to higher engagement, and stronger intent to book your services.
    • Ultimately, facilities with a virtual tour get up to 30% more clicks and higher rates of serious inquiries compared to listings without a 360° virtual tour, which provides you a significant edge.

    Bonus: Also, you don’t need crazy programs or a lot of technical knowledge to use it. Your tour will integrate easily into your Google Business Profile, your website, and you could even add a link to it in online appointment booking systems. So, you can just watch our YouTube video, and see how easy the integration is click here

    4. Showcase specialized services and comforts for patients

    With your virtual tour, you also have the opportunity to showcase certain areas and features of your facility you want to highlight, and that you are particularly proud of. For instance:

    • High-tech diagnostic equipment or designated treatment rooms
    • Comfortable, calming waiting areas
    • Children’s play area, or family waiting rooms
    • Rehab facilities or therapy suites
    • Surgical theatres, or recovery rooms
    • Accessible entrances, ramps, and patient friendly paths
    google 360 virtual tours

    Exactly, a virtual tour will highlight these spaces beautifully, allowing potential patients to see the entire layout of your facility, its unique features, innovations, and comforts offered as standard. This also permits patients to explore their possible next destination on their own, which greatly reduces the constant inquiries about facility features, accessibility, and amenities. Your front desk staff will then have more time to devote to actual patient care, rather than fielding basic questions.

    5. Improve Your Overall Digital Marketing

    Though in-person visits for consultations are important, they can be time-consuming and often not a viable option for patients with mobility issues, or those from out of town, or with limited availability. To solve this problem, a 360° tour provides important help by:

    • Allowing you to embed the tour on your services pages, ‘About Us’ section and contact page. This creates additional time on site, which is a great boost to your SEO.
    • Easy access to sharing the tour link via email, patient portals, and social media channels, which provides a wider audience and provides excellent trusted referrals.
    • A significant increase in the value of your Google Maps listing, which elevates your facility in local search results, the “best clinics near me”, “dental care”, “specialty hospital”, etc.

    Conclusion: A Smart Investment for Healthcare A Google 360° Virtual Tour is ultimately more than just an entertaining graphic; it is actually a smart investment into your healthcare facility’s visibility, credibility, and future growth. If you’re a clinic owner, hospital administrator, dentist, or head of marketing in Hyderabad or elsewhere in India, Sam Data Services will create a consistent virtual tour that achieves measurable results.

    Ready to Welcome New Patients? Let’s Get Started!

    Are you prepared to demonstrate your commitment to patient care digitally and completely reinvent your patient outreach strategy? If you would like to learn more about our entire process, please visit our website or contact Sam Data Services today to schedule a complimentary consultation and see how we can help your healthcare facility virtually come to life.-info@samdataservices.com

  • How Google 360° Virtual Tours Increase School Admissions and Build Trust

    How Google 360° Virtual Tours Increase School Admissions and Build Trust

    Introduction

    In today’s digital-first world, a Google 360 virtual tour for schools is absolutely essential for making a powerful first impression. When parents look for the best institution for their child, they no longer primarily rely on paper brochures or word-of-mouth. Instead, they consistently use Google searches, read online reviews, and explore your digital presence. Consequently, a professional virtual tour allows you to showcase your entire campus online—from classrooms and labs to libraries and playgrounds—thereby creating a realistic, walk-through experience that makes your institution truly stand out.

    Why a Virtual Tour is Your 24/7 Open House

    This innovative technology is, in fact, revolutionizing how schools across India and the globe enhance admissions, establish trust, and ultimately lead in a competitive education market. Essentially, it’s like an open house that’s available 24/7, accessible from anywhere in the world. You can, for example, see precisely how it works by checking out our portfolio on our website.

    1. Create a Digital First Impression

    Most parents’ first impression of your school happens online – either through your website (if you have one) or, more often, your Google listing. Therefore, a Google 360 virtual tour for schools immediately sets you apart by:

    • Creating a rich, immersive experience that static photos cannot match.
    • Allowing parents and students to “walk” your campus from their mobile, or desktop.
    • Establishing an emotional connection before they step through the gates.
    • Real Instance: A school in Hyderabad saw a 50% increase in inquiries three months after adding a Google Virtual Tour to their listing. You can view a gallery of our Completed tours on our website @samdataservices.com
    google 360 virtual tours

    2.Cultivate Trust with Parents Prior to Visiting

    For parents, the choice of a school is certainly not merely an academic one; they are deeply concerned about safety, cleanliness, infrastructure, and atmosphere. A virtual tour demonstrably shows you have nothing to hide and, consequently, offers the opportunity to answer key questions without the immediate need for an in-person appointment. This unparalleled transparency thus provides:

    • Increase Admissions with a Competitive Advantage
    • We all know every parent will compare and contrast other schools before making a decision. A Google 360° Virtual Tour achieves many things:
    • Your listing now stands out in Google Search & Maps
    • Parents spend more time exploring your listing
    • Schools with a tour receive up to 30% more clicks than those without

    3. Showcase What Makes Your School Unique-

    With a virtual tour, you have the ability to showcase particular areas of your campus that you would like to highlight (and are proud of). This includes-

    • Spacious classrooms
    • Library, state-of-the-art
    • Arena for sports (indoor/outdoor)
    • Classrooms for science and computer labs
    • Dining halls that are clean or hygienic
    • Activity areas for art, or music

    “A virtual tour brings these spaces to life, ensuring parents and students get a complete picture of the school’s offerings.”

    Allowing parents to explore at their own leisure, Reducing repetitive requests for infrastructure inquiries, Enabling your team to spend more effort on quality walk-ins, instead of mere curiosity.

    google 360 office virtual tour

    4. Improve Your Overall Digital Strategy

    Campus visits are key but they take time and are not always possible for out-of-town staff and parents. A 360° tour provides support by-

    • Embed the tour on your homepage, admissions page, and contact page to increase the on-site time that benefits your SEO.
    • Share the link on Instagram, Facebook, and WhatsApp for more friends to interact with the tour.
    • Increase the value of your Google Maps listing, elevating the rank of your site in local search results for “top schools near me.”

    Conclusion- “A Smart Investment to Secure Your School’s Digital Future

    A Google 360° Virtual Tour is more than a flashy feature it is a strategic investment in your school’s visibility, credibility, and future growth. If you are a school administrator or marketing head in Hyderabad or anywhere in India, Sam Data Services can help you create a professional virtual tour that drives results.

    Let’s Digitize Your School – Start Now Are you ready to showcase your campus online?

    Visit our website to learn more about our process or contact Sam Data Services today to schedule a free consultation and see how we can help your school digitally come alive. @samdataservices

  • Automate Form Filling from Excel | Focus Form Filler

    Automate Form Filling from Excel | Focus Form Filler

    Automate Form Filling from Excel-

    Let’s be honest—nobody actually enjoys filling out forms.
    It’s slow, kinda boring, and eats up way more time than it should. But the thing is—forms are everywhere. Whether it’s client info, product details, or internal stuff, someone always ends up typing things out manually. And let’s face it, doing that every day? Not ideal.

    That’s where Focus Form Filler comes in. It helps you completely skip the manual part by filling in forms for you. Just load up your Excel sheet, click a few buttons, and watch the magic happen. No coding, no complicated setup.

    Why Bother With Manual Work?If you’re working with spreadsheets all day, jumping between tabs and copy-pasting data—ugh. You know how frustrating it gets. And yeah, it also leaves room for errors. A small mistake could lead to bigger issues, especially in client data.So why not just stop doing it the hard way?

    Meet Focus Form Filler – Your Form-Filling Shortcut

    This tool makes it super easy to automate any form—whether it’s in a browser, software window, or desktop app. It types stuff out like a real person would. Honestly, it’s kinda cool to watch.

    And guess what? It’s not one of those expensive tools with hidden fees. You pay once and that’s it. No monthly stress.

    Some Things You’ll Love:

    • No coding – seriously, none.
    • Works anywhere – browser or desktop, doesn’t matter.
    • Human-like typing – adds backspaces and varies speed to look natural.
    • Custom hotkeys – so you can start/stop anytime.
    • Runs in the background – just set it up and relax.
    • Supports Excel and CSV – upload your file and go.

    focus form filler automation

    How to Use It (It’s Super Simple)

    1. Get your Excel file ready.
      • Just make sure your columns are in the right order.
    2. Open Focus Form Filler.
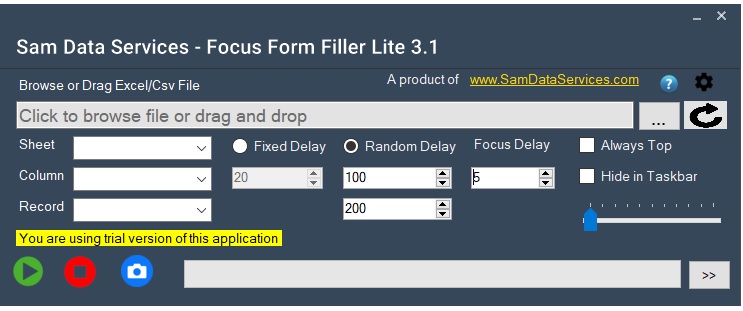
      • Choose your file, adjust the speed, turn on extras like random typing or backspaces.
    3. Click Start and place your cursor.
      • That’s it. It’ll start typing your data into the form field by field.

    Time to Ditch the Typing

    Why spend hours filling the same thing over and over when this can do it for you?

    • Less effort
    • Less mistakes
    • More time for literally anything else

    Works with Any Application!

    excel data demonstration

    Stop wasting time and energy on manual form filling. Focus Form Filler is way to increased productivity, reduced errors, and a happier work life.

    Download the free trial today and see for yourself! click to download

    Check out our affordable pricing plans and choose the one that’s right for you! click to check

    Focus Form Filler isn’t just about working faster—it’s about working smarter. Once you try it, you won’t want to go back.

    If any queries arise, you can contact us through email at samdataservices(at)gmail.com or by filling out the contact form

  • Best Auto Typer for Data Entry: Automate Typing-Focus Auto Typer

    Best Auto Typer for Data Entry: Automate Typing-Focus Auto Typer

    Manual typing for data entry can be exhausting, especially when you’re dealing with client tools that don’t even allow copy-pasting. If your day involves repeating the same lines over and over again — this might be the tool you’ve been waiting for.Let’s talk about Focus Auto Typer Pro, a simple typing automation tool made for people who just want things to work without the hassle.

    Why You Might Need It

    Sometimes, the usual copy-paste tricks don’t work. Some apps block it completely. That’s where this tool helps — it types everything for you, line by line, just like you would do it.

    You can use it with apps like MF Notepad, Agent8, Hub Notepad, or any custom tool where manual typing is the only option.

    Key Things It Can Do

    Here’s a quick look at the features that actually come in handy during real work:

    • Set Your Typing Speed:
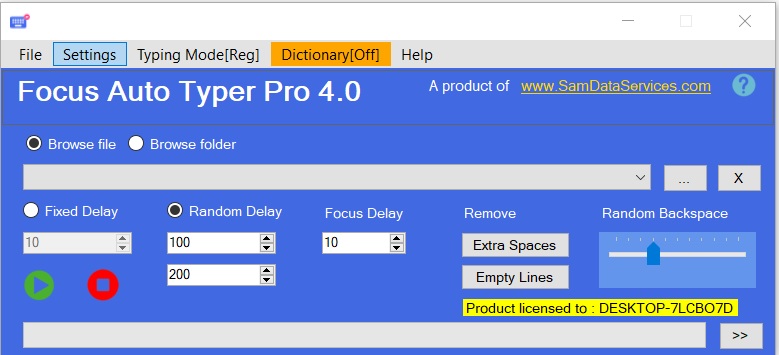
      • Want it fast? Slow? Somewhere in between? You can adjust the typing speed easily. There’s also a “random delay” option — it mixes up the speed so it feels more human.
    • Creates Mistakes with Backspaces:
      • This one’s smart — it types a few characters and then randomly backspaces like someone correcting a typo. Looks natural, especially on apps that watch for patterns.
    • Tidy Up Your Text:
      • Got extra spaces or weird line breaks? Just hit a button to clean those up before the typing begins. It keeps things neat and ready to go.
    • Works with Special Characters:
      • Whether it’s symbols, punctuation, or other non-standard keys the tool handles all of them without error.
    • No Text Limit (Pro Feature):
      • If you’re working with large files, the Pro version lets you input as much text as you want, no restrictions.

    Why Choose Focus Auto Typer Pro?

    Focus Auto Typer Pro is more than just an auto typing tool for fast data entry, it’s a solution for data entry automation. Its ability to bypass copy-paste restrictions, combined with its advanced features, makes it the best auto typer software for demanding data entry tasks.

    Downloading Focus Auto Typer is Simple:

    Here’s how you can start using Focus Auto Typer Pro in just a few minutes:

    1. Download the software: Download Focus Auto Typer Pro from samdataservices.Click to Download
      • Or check our guide on how to download and install here- click here
    2. Load Your Text File:
      • Once it opens, just choose whether to load a single file or a full folder. You’ll see buttons like “Browse File” or “Browse Folder” right at the top.
    browse files or folder option demo
    focus auto typer files display
    1. Set Your Speed
    2. On the left side, choose between:
      • Fixed delay for consistent speed
      • Random delay if you want it to type in a more natural rhythm.
    more features of focus auto typer explained
    1. Clean the Text
      • You’ll see two buttons — Remove Extra Spaces and Remove Empty Lines. Super handy if your text file needs a bit of tidying up.
    2. Want Realistic Errors? Turn On Backspace
      • On the right side, there’s a slider for Random Backspaces. Slide it up if you want the tool to make it look like someone’s typing and correcting mistakes.
    start stop features demonstration
    1. Let It Type
      • Click the green Start button at the bottom left, then just place your cursor wherever you want the tool to type. That’s it. Sit back and watch.
      • Need to stop? Hit the red Stop button anytime.
    2. Explore More Options
      • Click the “>>” button in the bottom corner to find extras like:
      • Line numbers
      • Highlighted sections that show where backspaces were used
    additional features representation

    Focus Auto Typer Pro mimics real manual typing, ensuring flawless results in any Client application This tool won’t replace you — but it will definitely save you a ton of time. Especially if your job involves a lot of copy-paste restrictions or plain old repetitive typing.

    Try it out. It’s simple, clean, and kind of a lifesaver on busy days.

    Try the free version today and experience the difference!

    If any queries arise, you can contact us through email at info@samdataservices.com or by filling out the contact form.

  • Install Focus Auto Typer Pro – Complete Setup Guide

    Install Focus Auto Typer Pro – Complete Setup Guide

    Want to save time on repetitive typing?
    Installing Focus Auto Typer Pro is quick and easy. This simple guide will walk you through everything, so you can install focus auto typer right away without any confusion. It’s a handy tool that can really cut down on the boring stuff and help you work faster.

    Why Install Focus Auto Typer Pro?

    It’s more than just a basic auto-typing tool. Focus Auto Typer Pro is built to make your work faster and easier whether you’re filling out forms, entering data, or just tired of typing the same thing over and over. It helps automate keystrokes, cut down on errors, and seriously boost your productivity.

    Key Features & Benefits-

    • Easy Text Loading: You don’t need to copy and paste everything manually. Just pick your file—whether it’s a PDF, Word doc, HTML, or plain text—and it loads right into the software. You can also drag and drop or paste if that’s quicker. For example, loading a full report takes just a click.
    • Human-Like Typing: Focus Auto Typer Pro doesn’t just dump text—it types it out, just like you would. The speed changes slightly each time, and even small backspaces are added to make it feel natural, not robotic.
    • Gets Around Copy-Paste Restrictions –If you’ve ever used software that doesn’t allow pasting, this tool has your back. Since it simulates real typing, it works even where copy-paste is blocked.
    • Custom Hotkeys– You can set up your own shortcuts to control everything—start, pause, resume, or even hide the app while it’s working.

    Tired of typing the same stuff again and again? We get it. Focus Auto Typer Pro is built to make life easier, especially if you deal with a lot of data entry or routine typing. Here’s how to set it up—don’t worry, it won’t take long..

    Let’s get started!

    1. Download Focus auto typer From Sam Data Services

    • click here to visit the Focus auto typer product page and click the “Download” as shown in the screenshot below. This will redirect you to the Download page.
    focus auto typer pro dashboard
    • Fill in your Name, Email and Country as shown in the image below and click on Download Button.
      This will typically download a ZIP file containing the extension’s files.
    download page demo

    2. Extract the Files:

    • Once the ZIP file is saved, find it (probably in your Downloads folder).
    • Right-click on it, choose “Extract All”, and pick where you want to keep the files.
    • Click Extract — easy.
    extract files of focus auto typer demo

    3. Run the Installer:

    • Now open that folder you just extracted.
    • Double-click on the installer file (it might be called “setup” or something like that).
    • An installation window will pop up. Click Next when you’re ready.
    begin of installation demo
    welcome wizard demo

    4. Add Your Information:

    • It’ll ask for your name and organization — type those in, nothing fancy.
    • Hit Next again.
    focus auto typer pro information demo

    5. Choose Where It Installs

    • By default, it picks a folder.
      You can leave it as is or click Change to put it somewhere else.
      Then click Next.
    destination folder demo

    6. Finish Installing

    • Almost there!
      Click Install when you see the final screen.
      If your computer asks for permission, just click Yes.
    install focus auto typer pro

    7. You’re All Set

    • Once it’s done, click Finish and go ahead — launch Focus Auto Typer Pro.
    • You’re now ready to automate boring typing and save yourself some serious time.
    finish button to complete installation demo
    focus auto typer pro

    Focus Auto Typer Pro is made to be simple and helpful. Once you set it up, it runs smoothly in the background and takes care of the typing while you focus on more important stuff.

    If any queries arise, you can contact us through email at samdataservices(at)gmail.com or by filling out the contact form.

  • Easy Form Automation: No Code Required (Desktop & Web)

    Easy Form Automation: No Code Required (Desktop & Web)

    Filling in forms by hand got you down? Wish there was an easier way? You’re in luck! Filling out forms can now be automated without having to write code. Use Focus Form Filler to help you complete all the forms your typical day requires,This is the article that will show you how it’s done, just to give you an idea of how simple automating a form is.

    Announcing Focus Form Filler – Your No-Code Answer.

    Focus Form Filler is especially developed for non-technical users. It doesn’t require difficult scripts or coding for form automation is for everyone. No need to struggle with code here, just pull your data into Excel or a CSV file and Focus Form Filler does the rest for you.

    How to Use Focus Form Filler:

    • First, you must get your data in order. Store the information in an Excel spreadsheet such that the columns match the fields in your target form. This is very important for the right data entry.
    excel sheet data representation

    Next, download and install Focus Form Filler from Sam data services. The installation process is straightforward and user-friendly.click to check our guide on installation click here

    Once installed, open the app.

     focus form filler dashboard

    Setting Up Your Automation:

    • Focus Form Filler Configuration Now it is time to configure Focus Form Filler. Navigate and choose the Excel file with your data. Next, set the typing rate to simulate human input for more realistic appearance of automation.
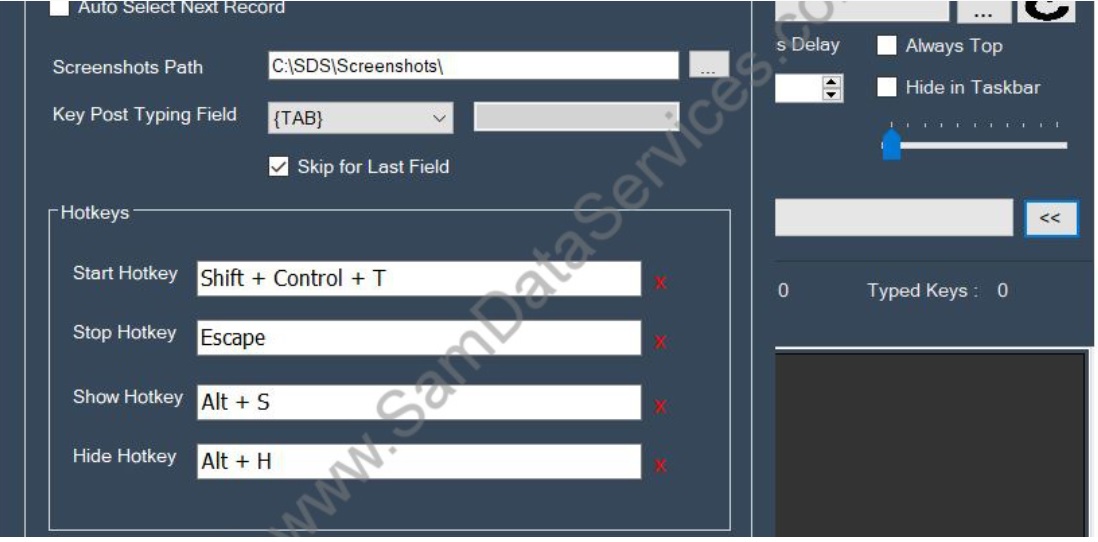
    • Additionally, you may configure hotkeys for kicking off or stopping the automation along with revealing or hiding the interface.
    • You can also check through the settings for more advanced options such as custom delays, screenshot capture, and more! The two offer more control of the automation process.
    focus form filler demonstration
    excel files upload demo
    demonstration of all features

    Automating Your Forms:

    • Click the “Start” button in Focus Form Filler, once you have set your settings.
    • After that, position your cursor on the initial field within the form that you would like to auto-fill.
    • Now,Focus Form Filler will start filling in the fields with the information from your Excel.
    start button of focus form filler
    form filling automation demo

    You’ll be amazed at how quickly and accurately it works.

    focus form filler automation
    submit button of focus form filler
    • In addition, you can configure Focus Form Filler to even automatically press the ‘Submit’ button for you after filling the form! This is great if you have a lot of forms to fill out. No more clicky-clicky, instead they do it all for you, hands-off.

    Advice For A Successful Automation:

    To make sure that automation runs without a hitch, open your Excel file and verify the accuracy and the format. And also change the typing speed according to the target application response time. Finally, custom delays if the form is needed with precise time only for entering the data.

    “Unlock the Power of No-Code Automation -Focus Form Filler is designed for anyone to automate form filling without requiring a technical background. So, instead of spending your time on manual data entry, let the power of no-code do the rest”

    Download it today and experience the difference. Click to download

    Check our guide to experiance smooth Activation of Focus form filler license click here

    If any queries arise, you can contact us through email at samdataservices(at)gmail.com or by filling out the contact form.

  • Focus Form Filler: Automate Forms Now Activate Your License

    Focus Form Filler: Automate Forms Now Activate Your License

    Do you get bored of filling forms the old-fashioned way?
    If you already experienced our trial version of Focus Form Filler and liked what you saw, let’s go ahead and activate your license.
    Two important things to note is this article guides you – the upgrade from trial to a license takes only a few minutes and you will be ready to go with Focus Form Filler, for a not so monthly fee.

    Get Focus Form Filler License

    Let’s be honest. The free trial gets you a good taste of what it will be like.
    After you activate your license, you can have the full package. In short, your license means you’ll have:

    • No usage limits
    • More control over how forms get filled
    • All features unlocked—Excel, hotkeys, delays, you name it
    • Lifetime access (yup, no monthly stress)
    • Help from the support team if you need it

    Step 1: Open Focus Form Filler and Generate the License Request File

    Let’s go through the three simple actions below.

    1. To start, you need to Open Focus Form Filler
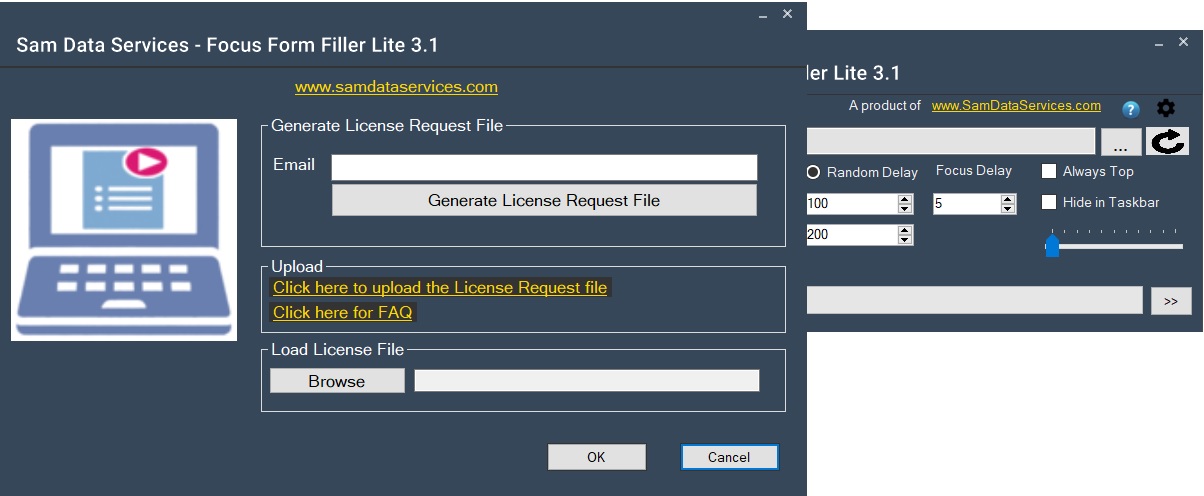
      • You should see a prompt to enter your email address (be sure to enter the same address that you used to register the license).
      • Next, click on the “Generate License Request File” button. This will create a small file, you then save it to a location that you will remember, you will need this file next.
    generate license request demo

    Step 2: Go to the Sam data services Purchase Page

    • Now, Click to go to the Focus Form Filler purchase page: click here
    • Want to see pricing first? check pricing plans
    • There’s a form there—upload the file you just saved and fill in the rest of your details.

    Step 3: Make Your Payment

    Pick what works for you: UPI, PayPal, bank transfer, etc.
    complete the payment, and you’re all set.

    payment details for focus form filler

    Step 4: Receive Your License Key

    Once your payment is confirmed, you’ll get an email with your license key file. It usually comes through pretty fast.

    Step 5: Activate the Software

    Open focus form filler
    There should be a field to upload the license file—click “Browse,” find your key, and confirm.
    Done!

    license activation for focus form filler

    And that’s it You’ve successfully activated your Focus Form Filler license.

    Focus Form Filler is made to save you time.
    Get the license, automate your tasks, and focus on what really matters.”

    checkout How To Install Focus Form Filler Lite 3.0: A Step-by-Step Guide

    If any queries arise, you can contact us through email at samdataservices(at)gmail.com or by filling out the contact form

  • How To Install Focus Form Filler Lite Complete Installation Guide

    How To Install Focus Form Filler Lite Complete Installation Guide

    Transform your data entry workflow with automated form filling software Are you tired of manually entering repetitive data into countless forms? This comprehensive guide will walk you through installing Focus Form Filler Lite 3.0, the ultimate form automation software that revolutionizes how you handle data entry tasks.

    What is Focus Form Filler Lite 3.0?

    Focus Form Filler Lite 3.0 is a powerful automated form filling tool that integrates seamlessly with your Excel spreadsheets to populate forms across desktop applications and web browsers. This productivity software eliminates tedious manual data entry, reduces human error, and saves countless hours of repetitive work.

    Key Benefits:

    • Excel integration for seamless data import
    • Cross-platform compatibility (desktop and web forms)
    • Time-saving automation that boosts productivity by up to 80%
    • Error reduction through consistent data entry
    • User-friendly interface suitable for all skill levels

    First, Download Focus Form Filler Lite 3.0

    • Go to the Focus Form Filler Lite 3.0 download page- click here
    focus form filler lite 3.0 page
    • Next,You may be asked to provide some basic information (name, email, country, etc.).Then Click the download button again to start the download.
    download page for focus form filller

    After that, Extract the Files-

    • When the file has downloaded, find the ZIP file on your computer (usually in the Downloads folder), right-click on the ZIP file and select Extract All.
    • Then, choose where you would like the files (your Desktop or a New folder).
    • Finally, click the Extract button to finish extracting the files.
    extraction files demo

    Once extracted, find the installer-

    • Now you need to find the installer file. This is done by double-clicking the installer file to start the installation.
    run the installation demo

    Welcome to the Installation Wizard

    • Now, an installation wizard will pop up. It’ll say welcome and give you a bit of info — go ahead and click Next to continue.
    welcome dashboard

    Choose Installation Options (Everyone or Just Me)

    • You will be presented with the option to install for “Everyone” or “Just for me”. Choose the option that best suits your needs and click “Next” to continue
    select installation folder of focus form filler 3.0

    User Account Control (UAC) Prompt

    • Allow Changes: A User Account Control (UAC) prompt might appear, asking if you want to allow the application to make changes to your device. Click “Yes” to allow the installation to proceed.

    Begin the Installation Process

    • Install: Click “Next” and start installing Focus Form Filler Lite 3.0 on your computer.
    next button demonstration

    Finally, hit “Close” when it’s done.

    • Close: Once the installation is complete, you’ll see a confirmation message. Click “Close” to close the installation wizard.
    complete installing focus form filler

    Now you can launch the application and begin automating your form filling tasks, saving valuable time and effort.

    Ready to revolutionize your data entry process? Download Focus Form Filler Lite 3.0 and experience the future of form automation!

    Focus Form Filler Lite 3.0 represents a significant advancement in form automation technology. By following this comprehensive installation guide, you’ll quickly transform your data entry processes and experience dramatic productivity improvements.

    Start your journey toward automated form filling today and discover how this powerful Excel-integrated software can streamline your workflow, reduce errors, and save valuable time on repetitive tasks.

    Need Help or More Information?

    Product Page: Visit the Focus Form Filler Lite 3.0 product page for detailed information about the software’s features and benefits: click here

    If any queries arise, you can contact us through email at info(at)samdataservices.com or by filling out the contact form

  • TXT to DOCX, DOCX to TXT Made Easy:Text to Word Converter

    TXT to DOCX, DOCX to TXT Made Easy:Text to Word Converter

    Are you tired of converting text files to Word documents (and the other way around) by hand? Are you having issues making batch conversions? The Text to Word Converter makes it easy and fast to convert from TXT to DOC / DOCX and DOC / DOCX to TXT. This easy to follow guide will take you through the steps needed to speedily learn the Text to Word Converter and increase your productivity.

    What is Text to Word Converter?

    Text to Word Converter is a software application designed to facilitate the conversion of text files (.txt) into Microsoft Word documents (.doc/.docx) and vice-versa. Its real value is use of batch conversions allowing you to convert multiple files of the same type at once. Rather than converting files one at a time every time; you can convert and save numerous files at once to save you a considerable amount of time and effort.

    Getting Started with Text to Word Converter

    • Getting started wit Text to Word Converter First, you need to download and install Text to Word Converter using this link-click here
    • Next, just follow the easy on-screen instructions to install Text to Word Converter on your computer, or if you need additional guidance you can follow our guide on how to install installation guide

    License Activation:

    • Once you have installed the Text to Word Converter, you need to activate your Text to Word Converter license. You can purchase a license that will suit your needs from sam data services to click to buy a license-buy license
    • Then follow our activation guide- License Activation Guide Link

    Step by Step Instructions on how to use Text to Word Converter

    This section explains how to get the most out of the Text to Word Converter software.

    1. Open the Software:
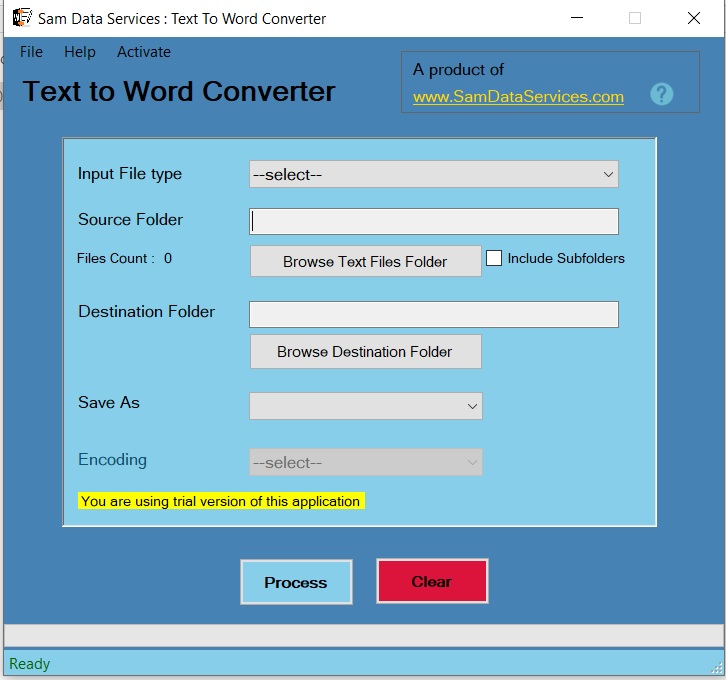
      • To start, open the Text to Word Converter program on your computer.
    2. Select Input Files:
      • Next, the “Browse Folder” button is clicked. This brings up a file browser window where you are able to choose the folder that contains the text files that you would like to convert using Text to Word Converter. Select the folder you wish and click “OK.
    browse files demonstration of txt to word converter
    1. Select Output Location:
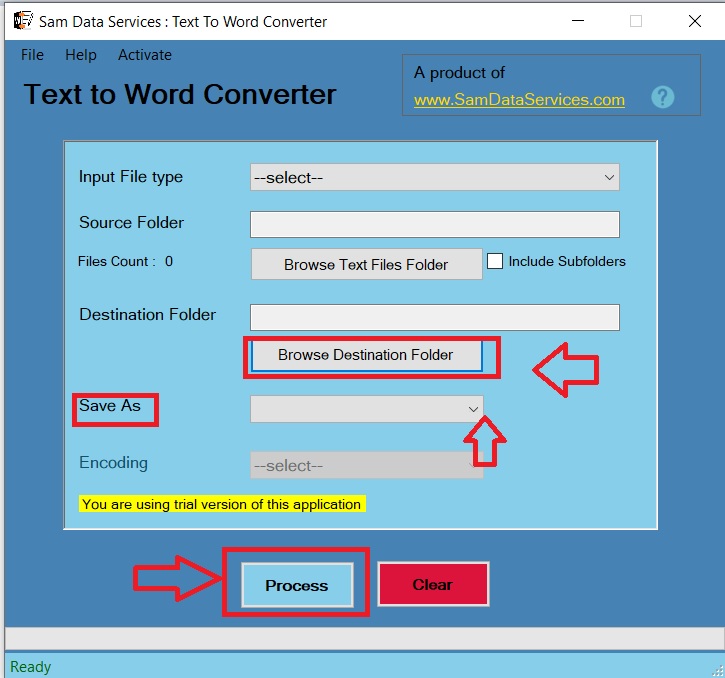
      • At this step you need to select the folder you want Text to Word Converter to save the converted files. Click the “Browse Destination Folder” button and select the folder you want.
    2. Select Output Format:
      • Then, select the desired output format (DOC or DOCX) from the “Save As” dropdown menu. This determines the file type of your documents converted by Text to Word Converter.
    3. Start Conversion:
      • Finally, click the “Process” button to initiate the conversion using Text to Word Converter. The software will then process the files and save them to the specified location in the chosen format.
    text to word converter process

    Text to Word Converter is a very useful tool for anyone who regularly works with text and Word files. By following the procedure in this guide you can learn how to use its features fast and improve your conversion workflow.

    Start using Text to Word Converter today and experience the convenience of fast, efficient, and effortless file conversions!

    If any queries arise, you can be contact us through email at samdataservices(at)gmail.com or by filling out the contact form

  • Activate Text to Word Converter License – Easy Steps

    Activate Text to Word Converter License – Easy Steps

    Converting files, such as text files to Word documents and the other way around, can sometimes be an exhausting task, and when files turn into multiple files, it can seem grueling. Text to Word Converter makes this a smooth simple task, especially through its power of batching the conversion of TXT to DOC/DOCX and DOC/DOCX to TXT.. We will discuss what is Text to Word Converter and we will go through the documented steps of the activation process for your Text to Word Converter license.

    What is Text to Word Converter?

    Text to Word Converter is a very powerful tool for converting a text file to Word document and vice versa. The key feature of this valuable product is the ability to batch convert multiple files at once which can save you lots of hours with the process when converting the files manually.

    Activate Your Text to Word Converter License-

    Activating your Text to Word Converter license is an easy task. In a few simple steps, you will be able to use the Text to Word Converter application, which will allow you to truly enjoy the benefits of the software!

    Step 1: Run Text to Word Converter and Click “Activate”

    • First, open the Text to Word Converter application on your computer.
    • Next, locate the “Activate” button, which should be on the top left corner of the application window, and click it.
    activate button demo on the application

    Step 2: Create your License Request

    • To begin, a new window will pop up. In this window, type the email that you used when purchasing the Text to Word Converter. Then hit “Generate License Request File.” This will generate a file with the information we need for your license, please save the file to your computer.
    activate text to load converter demo

    Step 3: Go to Sam Data Services Buy Page

    • click here to go to the Text to Word Converter buy page.
    • There you will see the buy page with a form. First, please upload the license request file you saved previously. Then complete the other parts of the form.
    form filling demo

    Step 4: Make Your Payment and Receive Your License Key:

    • Next, select your payment method (PayPal, UPI, Bank Transfer, etc) and complete the payment process. Once your payment is completed. We will email you your Text to Word Converter license key.

    Step 4:Activate the Software

    • Then go back to Text to Word Converter,click Browse button to find the license key file that was saved from your email, and select into this field.
    demonstration of activating the license

    By following these simple steps you can easy activate your Text to Word Converter license. With your license activated you will now be able to use the full functionality of Text.

    So, go ahead and activate your license today to experience the convenience and efficiency of Text to Word Converter!

    If any queries arise, you can be contact us through email at samdataservices(at)gmail.com or by filling out the contact form